Introduction to Soldering Copper Pipes
Soldering copper pipes is an important skill for any DIY plumber. This process involves joining copper pipes using solder and heat, creating a secure and leak-proof connection.
What is soldering?
Soldering is a process that involves joining two or more metal pieces together using heat and a filler metal called solder. This creates a strong and permanent bond between the pieces. Soldering is commonly used in plumbing to connect copper pipes. J&D Mechanical Services offers professional soldering services for all your plumbing needs. Contact them at 540-349-2408 or schedule an appointment online at https://janddmechanical.com/request-service/.
Why soldering copper pipes is important for DIY plumbing?
Soldering copper pipes is important for DIY plumbing because it creates a secure and watertight connection between the pipes, ensuring the integrity and functionality of the plumbing system. Contact J&D Mechanical Services at 540-349-2408 or schedule an appointment online at https://janddmechanical.com/request-service/ for professional soldering services.
Safety Precautions and Tools
When soldering copper pipes for DIY plumbing, it is crucial to follow safety precautions such as wearing protective goggles and gloves. It is also essential to have the necessary tools, including a propane torch, pipe cutter, emery cloth, flux, and solder. Contact J&D Mechanical Services at 540-349-2408 or schedule an appointment online at https://janddmechanical.com/request-service/ for professional soldering services.
Safety precautions for soldering
Safety precautions for soldering include wearing protective goggles and gloves to protect against potential burns and eye injuries. It is crucial to work in a well-ventilated area to avoid inhaling fumes.
Tools needed for soldering copper pipes
To solder copper pipes, you will need the following tools: a propane torch, soldering flux, emery cloth or sandpaper, a pipe cutter or hacksaw, a pipe cleaning brush, a wire brush, and lead-free solder.
Preparation
To prepare for soldering copper pipes, measure and cut the pipes to the desired length. Clean and prepare the pipes and fittings by using a wire brush and emery cloth. Apply flux to the joints before soldering.
Measuring and cutting copper pipes
To ensure a proper fit, measure the length needed for the copper pipes using a measuring tape. Cut the pipes with a pipe cutter or hacksaw, following the measurements taken.
Cleaning and preparing the pipes and fittings
Cleaning and preparing the pipes and fittings is crucial before soldering copper pipes. Use a wire brush or emery cloth to clean the exterior of the pipe and the interior of the fittings.
Soldering Techniques
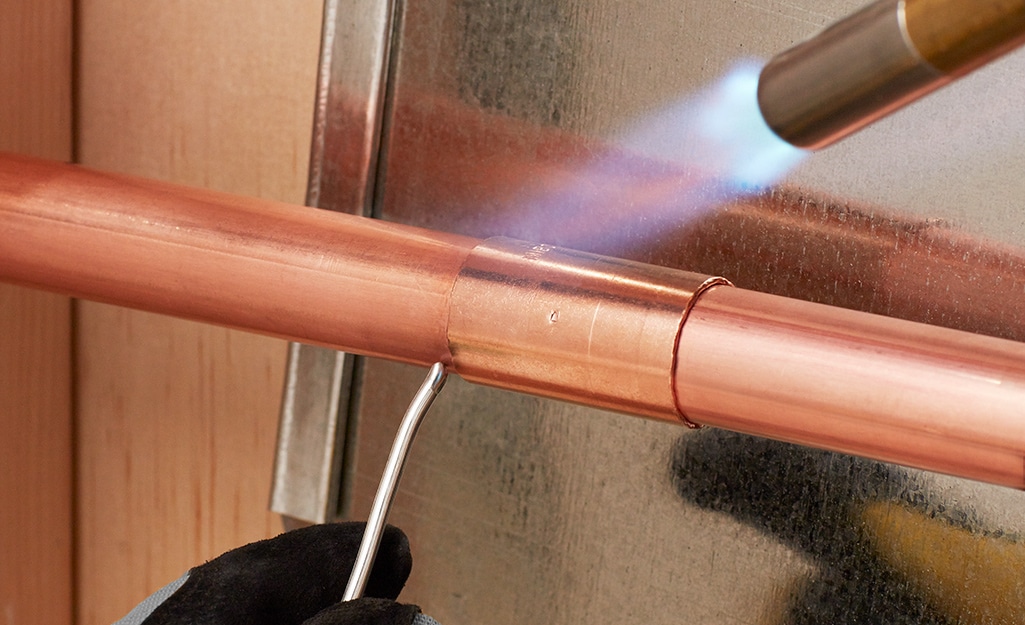
When soldering copper pipes, it is important to apply flux to the joints before heating and applying solder. This ensures proper bonding and a leak-free connection. Heat the joint evenly using a propane torch and apply solder to the heated joint, allowing it to flow into the joint. Ensure that the solder completely surrounds the joint for a secure and durable connection.
Applying flux to the joints
Before soldering copper joints, it is essential to apply flux to ensure a proper bond. Flux helps to clean and protect the copper, allowing the solder to flow smoothly.
Heating and applying solder to the joints
Heating and applying solder to the joints is the next step in soldering copper pipes. After applying flux, use a propane torch to heat the joint evenly. Once the joint reaches the correct temperature, touch the solder to the joint, allowing it to flow and create a secure bond. Remember to follow all safety precautions during this process. For more detailed instructions and tips on soldering copper pipes, schedule an appointment with J&D Mechanical Services at 540-349-2408 or visit their website at https://janddmechanical.com/request-service/.
Troubleshooting and Common Mistakes
It is important to be aware of common mistakes and troubleshooting techniques when soldering copper pipes. Some common mistakes include applying too much solder, not heating the joint evenly, and using the wrong type of solder. If you encounter any issues during the soldering process, here are some troubleshooting tips:
- Inspect the joint: Check for any signs of incomplete soldering, such as gaps or leaks. If necessary, reheat the joint and apply more solder to ensure a secure connection.
- Check the temperature: If the solder is not melting properly, the joint may not be reaching the correct temperature. Make sure to evenly heat the joint and reapply the solder.
- Clean the pipes and fittings: One common mistake is not properly cleaning the pipes and fittings before soldering. Make sure to thoroughly clean the surfaces with emery cloth or a wire brush to remove any dirt or debris.
- Use the right type of solder: There are different types of solder available, such as lead-free or lead-based. Ensure that you are using the appropriate solder for your application.
- Practice proper technique: Soldering takes practice, so if you are struggling with getting a clean solder joint, take the time to practice on scrap pieces of copper pipe before attempting the actual soldering job.
By being mindful of these common mistakes and troubleshooting techniques, you can ensure a successful soldering job for your copper pipes. If you need further assistance or guidance, feel free to contact J&D Mechanical Services at 540-349-2408 or visit their website to schedule an appointment.
Troubleshooting soldering issues
If you encounter any issues during the soldering process, such as incomplete soldering or leaks, inspect the joint and reheat it if necessary. Check the temperature, clean the pipes and fittings, and use the right type of solder. Practice proper technique to ensure a successful soldering job. For further assistance, contact J&D Mechanical Services at 540-349-2408 or visit their website to schedule an appointment.
Common mistakes to avoid during soldering
Common mistakes to avoid during soldering copper pipes include using the wrong type of solder, not cleaning the pipes properly, overheating the joint, and applying too much solder. It is also important to avoid rushing the process and not allowing sufficient time for the joint to cool before handling it. For professional assistance with soldering or any other plumbing needs, contact J&D Mechanical Services at 540-349-2408 or visit their website to schedule an appointment.
Conclusion
In conclusion, soldering copper pipes is an essential skill for DIY plumbing. By following safety precautions, utilizing the proper tools, and employing the correct techniques, homeowners can confidently complete their soldering projects and ensure reliable and leak-free connections. Contact J&D Mechanical Services at 540-349-2408 or visit their website to schedule an appointment for professional assistance with soldering or any other plumbing needs.
Recap of the soldering process
The soldering process involves measuring and cutting copper pipes, cleaning and preparing the pipes and fittings, applying flux to the joints, and heating and applying solder. Following these steps ensures a strong and leak-free connection. Contact J&D Mechanical Services at 540-349-2408 or visit their website to schedule an appointment for professional assistance with soldering or any other plumbing needs.
Tips for successful soldering of copper pipes
To ensure successful soldering of copper pipes, it is important to follow these tips:
- Use the right type and size of solder for copper joints.
- Make sure the pipes and fittings are thoroughly cleaned and free of debris.
- Apply flux evenly to the joints for better solder flow.
- Heat the joint evenly and avoid overheating.
- Use a soldering torch with adjustable flame for better control and precision.
- Be patient and allow the solder to cool and solidify before moving the pipes.
- Inspect the joints for any leaks after soldering and make necessary adjustments if needed.